Thursday, October 29, 2015

Palitaw


You might be asking what is Palitaw?  It is a sweet  rice cake in the Philippines.  It is made from ground sticky rice that is often rolled in a circular shape.  It is cooked by dropping the sticky rice in boiling water.  Once the sticky rice floats to the surface, it is done!  After the sticky rice is cooked, it is rolled in grated coconut, sugar, and toasted sesame seeds.  I like to make them in various shapes. 

My oldest loves to eat Palitaw and make them.   I do have to warn you, rice flour is quite sticky so keep an eye on what your little one touches!  The recipe below came from Pinch of Yum.  I made a slight change and added toasted sesame seeds in the recipe.


Ingredients
  • 4½ cups glutinous rice flour
  • 2 cups water
  • sugar for dusting
  • shredded coconut for dusting (unsweetened)
  • toasted sesame seeds  (optional)

Instructions

  • Mix the glutinous rice flour with the water until a thick, sticky mixture forms. Roll flat on to  a surface so you can cut into shapes or you can roll it into small balls.
  • Bring a large pot of water to boil. Add the glutinous rice shapes/balls and boil until solid and floating to the top, about 10 minutes. Drain the water and let the palitaw cool slightly.
  • If you do decide to put toasted sesame seeds, you can toast them by putting some sesame seeds in a pan until they are golden brown.  Once they are golden brown, put them in a bowl and let them cool. 
  • When the rice cake is cool enough to handle, roll the shape/ball in a bowl of sugar, coconut, and toasted sesame seeds. 

 Things your little one can do

  • Roll the mix of glutinous rice flour into small balls or cut into various shapes.  I gave each of my kids their own bowls and heart shape cookie cutters.
  • Have them roll the cooked and cooled rice shapes/balls in the sugar, coconut, and sesame seeds mix.  I placed all 3 ingredients in one bowl.  Each of my little one had their own bowl.
  • Don't be surprise if they try to sneak one in their mouth right after they finish rolling one rice cake in the sugar, coconut, and toasted sesame seeds mixture.


Tuesday, October 27, 2015

Mac and Cheese Bites


Mac and Cheese is one of my son's favorite dish.  He makes sure it's on the menu every time we have family gatherings.  When I found this recipe on Annie Eat's.  My two kids absolutely love these mac and cheese bites. You can make them using a standard cupcake pan or mini cupcake pan.  For nibblers like my son, I suggest the standard cupcake size.  I prefer the standard size when packing my kids lunch.  

Ingredients

12 oz. elbow macaroni noodles
2 cups butter cracker crumbs (such as Ritz)
3 cups shredded sharp cheddar cheese, divided
6 tbsp. unsalted butter, melted
1 (5.2 oz.) package Boursin garlic herb cheese
2 tbsp. cold unsalted butter
2 large eggs
¾ cup milk
¼ cup sour cream
¼ tsp. salt
Pinch red pepper flakes


Directions
 
  • Preheat the oven to 350˚ F.  Bring a large pot of water to boil.  Cook the pasta according to the package directions.  Drain well.  Meanwhile, lightly grease standard size cupcake pans with cooking spray. 
  •  In a medium bowl, combine the cracker crumbs, ½ cup of the shredded cheese, and melted butter and mix until combined.  Spoon a bit of the mixture into the bottom of each cupcake well and tamp down with the flat bottom of a glass or other.
  • Once the pasta is cooked and drained, add it to a large mixing bowl with the remaining shredded cheese, the Boursin and cold butter.  
  • In a liquid measuring cup, combine the eggs, milk, and sour cream and whisk to combine.  Add the liquid mixture to the bowl with the pasta.  Stir in the salt and red pepper flakes and mix until evenly combined.
  • Divide the macaroni mixture between the prepared cupcake wells.  Bake until light golden, about 20-25 minutes.  Let  the mac and cheese bites cool in the pan for at least 10-15 minutes before taking them out.

Things to do with your little one


  • You can have your little one turn Ritz crackers into crumbs by putting the crackers in a zip-log bag and have him/her smash it into crumbs.
  • You can have them measure the ingredients and put them in a bowl
  • Your little one can mix all the ingredients together
  • Your little one can spoon the cracker crumbs and mac mixture into the cupcake wells

Sunday, October 25, 2015

Chicken Arroz Caldo


I have been feeling under the weather the past few days and was craving for some Chicken Arroz Caldo.  What's Chicken Arroz Caldo?  It is the Filipino version of rice porridge or congee.  It's one of my comfort foods.  My mom often made it when someone wasn't feeling well or if it was just a cold day.  It reminds me a lot of my childhood  when I was growing up.  It's a dish you can eat either for breakfast, lunch, or dinner.   Now my kids ask for it when they are feeling under the weather or just need a pick me up.  It's such a simple dish but so satisfying.

Ingredients

2 tablespoons vegetable oil
4 garlic cloves, peeled and finely chopped
1 small onion, chopped, about 1/3 cup
1  piece of ginger, peeled and finely chopped, about 1/2 tablespoon
2 pinches of saffron (I like to use a lot because my mom used a lot )
1 large boneless chicken breast, cut into 1-inch pieces
1 cup jasmine rice
6 cups chicken stock
1 teaspoon fish sauce (This is optional)
4 spring onions, thinly sliced for garnish  (I like to put a lot in mine, you can use less)
3 hard-boiled eggs, sliced for garnish
3 calamansi or limes

Instructions

  • In a big pot add water enough to cover the chicken that you will use.  Add some salt and pepper.  Let it boil until the chicken is fully cook.  Once it is cook set aside and cool.
  • After the chicken breast has cooled, you can cut  it in 1 inch pieces.
  • Sauté the garlic in oil in a medium saucepan over medium heat. Cook until golden brown, about 2-3 minutes.
  • Transfer the garlic to a paper towel-lined plate to drain and let cool. 
  • Add the onion, ginger, and saffron. Cook until the onion is translucent.
  • Add the cooked chicken, rice, chicken stock, and fish sauce. Cover the pan and simmer over medium to low heat.  I usually pour the chicken stock enough to cover the rice.  If it still needs more stock pour in the rest of your stock.  Stir frequently and simmer until the chicken and rice are cooked through, about 25 to 30 minutes. Note: the amount of stock you put depends on how thick you want your Chicken Arroz Caldo. 
  • Once the rice has cooked to your liking you can put some in a bowl and garnish it with some hard-boiled eggs, spring onions, fried garlic, and calamansi.

Things your  little one can do
  • Once you have put the Chicken Arroz Caldo in bowls ready to serve, have them put the garnish on.  Remember it is HOT.  Please supervise you kids when they do this. 


Friday, October 23, 2015

Apple Munchies


My preschooler loves to snack on apples after school.  I usually just give him a whole apple and have him munch through it.  It's a nice after school snack because it's easy and healthy.  Mommy just gets an apple, washes the apple, and hands it to the little one.  Unfortunately, this only works for my oldest one.  My youngest one...not so much.  My two year old likes snacks that have stuff she likes...like CHOCOLATE.  This is a snack I personally love because it lets me control the amount of chocolate to serve.  I usually put 3-4 morsels...dependings how big the apple slices are. Your little one can help put toppings on their apple slices,  keeping them busy and happy.  This is what this mommy likes the most.  I usually prepare small bowls of peanut butter, granola, coconut flakes, and chocolate morsels for each of my little one.

Ingredients
  •  2 apples (I use Fiji apples)
  • peanut butter (I use WOW Peanut Butter because my two year old is allergic to nuts)
  •  granola of your choice
  •  coconut flakes
  • chocolate morsels of your choice (I personally like the dark ones)

Instructions
  • Slice the apples into your liking..either chips or wedges
  • Spread peanut butter with a spoon
  • Have fun putting toppings on them

Things your little one can do
  • Spread peanut butter on their apple slices with a spoon
  • Have them put various toppings on them
  • You don't have to use the toppings I listed above. You can tweak it and use raisins, chocolate sprinkles, drizzle some caramel, cinnamon,  dip them in yogurt...it's up to you.  The combination is endless.


Sunday, October 18, 2015

Cheesy Apple Mini Muffins


I was reading the Aug/Sept 2015 Parent & Child magazine given to me by my daughter's Kindergarten teacher and noticed this recipe for Apple Cheese Muffins.  It looked very easy to make even for a novice baker such as myself.  I decided to mark the page and make it as an evening activity I can do with my 3 and 5 year old.  I knew any baking that results in anything cupcake shaped would be something my kids would want to do, but for the taste I wasn't so sure.  I mean cheese and apples??

Well...as I type this post I can tell you that we did bake this last night, and we don't have any more left.  Yup, all 24 mini muffins have disappeared.  I was lucky enough to be able to steal some muffins under my kids' noses for their lunches.   My kids L-O-V-E-D these muffins! It's so quick and easy to make that I thought I'd share the recipe with you.

Ingredients:  

1 1/2 cups All-purpose flour
1 tsp baking powder
1/4 tsp salt
1 cup buttermilk
1/4 cup vegetable oil (I didn't have this on hand, so I used canola oil)
2 lightly beaten eggs
1 Granny Smith Apple, finely chopped
1/2 cup shredded Monterey Jack Cheese

Directions:
  • Preheat oven to 350 F 
  • Coat a 24 cup mini-muffin pan with cooking spray (I used two 12 cup mini-muffin pans and canola cooking spray)
  • Whisk the flour, baking power, and salt in a large bowl. (This will be the bowl you will put all the ingredients in.)
  • Whisk the buttermilk, vegetable oil, and 2 lightly beaten eggs in another bowl. (So, you need 2 bowls. One for your dry ingredients.  Second for your wet ingredients)
  • Pour the wet ingredients into the dry ingredients.  Whisk until mixed.
  • Fold in the chopped apple pieces and  the Monterey Jack Cheese.
  • Spoon into the pan and bake for 24 minutes
Things your little one can do:
  • With your supervision measure out the ingredients and add into the bowls.
  • Whisk the dry ingredients.  
  • Whisk the wet ingredients.
  • Add the wet ingredients to the dry bowl
  • Add and mix in the apple pieces and cheese
  • Spoon the mixture into the baking pan
This recipe was great because it allowed both my kids to whisk separately.  My older daughter took care of the wet ingredients while my son took care of the dry.  My daughter then helped me pour her wet ingredients into my son's bowl. They each took turns mixing the apple pieces and cheese into the mixture.  Both then happily spooned the mixture into their own mini-muffin baking pan.  My kids were so proud and took ownership of each baking pan they were assigned to.  After I placed each pan in the oven they even sat in front of the oven watching their muffins rise and bake.

Source:  Parent & Child Magazine  Aug/Sept 2015 Issue p 96


Thursday, October 15, 2015

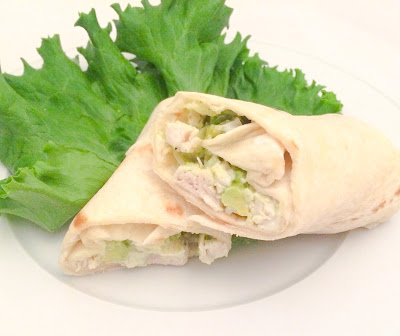
Chicken Avocado Burritos


This recipe is for avocado lovers like myself.  I love anything with avocado...I even LOVE avocado ice cream.  Not only is this recipe healthy and easy, it is DELICIOUS!  I came across this recipe while looking through pinterest for avocado related recipes.  I love this recipe not just because it's easy but it's very lunch box friendly.  This recipe is from the website omgchocolatedesserts.com.  I added lemon to the recipe since I was planning to serve them for dinner as well as for lunch the very next day.  My tweaks are shown in red.


Ingredients


  • 2 cups cooked and shredded chicken (or 2 chicken breasts, salt and pepper- to taste, 1 Tablespoon mustard, 1 Tablespoon olive oil)
  • 1 cup grated cheese   (I use white cheddar)
  • 1 avocado - diced (I use 2 avocados)
  • 2 Tablespoons cilantro-chopped
  • 4 large tortillas
  • 4 Tablespoon sour cream
  • 1 Tablespoon oil
  • lemon juice from medium size lemon   (added this to the avocado so it won't turn dark)

Instructions


  • Heat 1 tablespoon olive oil in a frying pan, place chicken breast sprinkled with salt and pepper and roast for about 5 minutes on each side. Spread 1 tablespoon mustard over the chicken, add about ¼ cup water add cook covered for a few more minutes.
  • Cut cooked chicken into thin stings. I chop the cooked chicken.  Makes it easier for my toddler to eat.
  • Pour lemon juice over the diced avocados and mix well.
  • Mix the chicken, cheese, and  cilantro with the diced avocados.
  • Spread 1 tablespoon sour cream on each tortilla, add ¼ of the mixture, form a roll.
  • Heat 1 tablespoon oil into a pan and place all four tortillas on the pan, cook for 2 minutes on medium- high heat. Flip on the other side and cook for another minutes or until the the tortillas are golden. 
 
Things you little one can do


  • Mix the chicken, cheese, cilantro, and the diced avocados
  • Have them make put together their own burrito

Tuesday, October 13, 2015

Spider PB&J Crackers


My kids love Ritz crackers.  They can each finish one package of it. This snack is easy enough that my 3 year old can also make one all by himself.  What's great is you can even add this in kids lunches.  It will definitely bring a smile on their faces upon seeing something crafted with a Halloween theme.

Ingredients

  • WOW Peanut Butter  (You can use real peanut butter, I used fake because my kids have a no nut policy at their school)
  • Jelly (I used strawberry just because my kids love strawberry)
  • Ritz Crackers
  • Pretzel sticks (The ones I got were the long ones so I broke them in half)

    Directions
    • each spider needs 2 Ritz crackers and 8 pretzel sticks ( 4 pretzel sticks if long ones broken in half).
    • take one cracker and spread the fake peanut butter on it.  
    • layout the pretzel sticks over the cracker with the peanut butter.
    • add jelly in the center over the pretzel sticks
    • take another cracker and spread fake peanut butter on it (this will act as a glue to help keep the legs in place.

    Things your little one can do

    • To avoid spoiling the containers which hold the fake peanut butter or jelly transfer them to bowls your child can use.
    • Use spoons to spread the fake peanut butter and jelly on to the crackers (I used toddler spoons)
    • Have them arrange the legs on the spider and count the legs.
    • Assemble the top on the spider to finish it off.


    Sunday, October 11, 2015

    Mummy Toast


    Looking for a quick Halloween snack to make with your little one?  How about these adorable Mummy toasts! They are so fun and easy to make my toddler was able to make one all by herself!  I came across this idea from bolevalecheese.com website. 

    Making season themed snacks is a great idea to make your kid's snacks more exciting.

    Ingredients

    Sliced bread
    Pizza sauce
    Mozzarella cheese cut into strips or use string cheese pulled into strips
    Sliced black olives

    Directions

    • Toast the bread. 
    • Spread on a layer of pizza sauce 
    • Arrange the cheese so that it resembles mummy bandages. 
    • Hide the black olive eyes so that they peak out from under the cheese bandages.
    • Pop them under the broiler until the cheese melts slightly 

    Things your little one can do 
    • Give your little one a spoon to spread a layer of pizza sauce on his/her bread
    • Have them place the cheese and olives on the bread
    • Your little one can try making monster faces on their pizza bread. Be creative!